Hello dear Amigurumi Knitting Lovers
Today we share a free amigurumi crochet pattern for you. As you know, we share new amigurumi free patterns every day. master crochets, amigurumi gazelles, amigurumi bears, amigurumi pola, amigurumi pandas, amigurumi penguins, amigurumi giraffes, amigurumi lama, amigurumi pigs, amigurumi rabbit, amigurumi clowns, amigurumi dolls, amigurumi unicorn, amigurumi elephants, amigurumi unicorn , amigurumi hippos, amigurumi monkeys, amigurumi cats, amigurumi dogs and more…
Today, the new daily crochet pattern Amigurumi, Bunny with Flower Free Crochet Pattern, I want to give you some information about this pattern;

MATERIALS
YARN
100% Cotton DK weight yarn of your own choice.
I used Ricorumi Cotton DK 25g in the following colours.
Beige 055 x 2 – Head, body, arms & legs (or lighter option Ivory 061)
Cream 002 (small amount) – Tail
Small amounts of Rose 008, Smokey Rose 010, White 001 and
Pistachio 047 for the flowers and leaf garland
Small amount of pink yarn for the nose and cheeks
For a softer fluffy version I have used Ricorumi’s Nilli Nilli (DK chenille 25gm) yarn for the main parts (see main image on page 12).
Beige 022 x 2 – Head, body, arms & legs (main parts)
All other parts are made using cotton yarn – Tail light grey 003, flowers and leaf garland
as above.
OTHER MATERIALS
- Crochet hook size 2.25mm (2.5mm for Nilli Nilli yarn or a size you are comfortable with)
- Black embroidery thread / small amount of black sport weight yarn / small amount of white DK yarn for the eyes
- Long embroidery needle / tapestry needle
- Soft toy filling
- Stitch markers / round headed pins / scissors
ABBREVIATIONS
mr – magic ring
st / sts – stitch / stitches
sl st – slip stitch
ch – chain
sc – single crochet
inc – single crochet increase
dec – sc decrease (dec 2 sts together FLO)
dc – double crochet
hdc – half double crochet
hdc inc – half double crochet increase
rnd – round
F/O – fasten off
[…] * … – repeat instruction in brackets … times
(…) – total number of sts in round / row
FINISHED SIZE
Approximately 16cm in height for the cotton version, 19cm for the Nilli Nilli version and when using the recommended hook size.
NOTES
Work in continuous rounds unless otherwise stated in the pattern.
I have used the ‘x’ stitch to create my Blossom the Bunny (yarn under technique).
Using different materials and hook size to what is recommended may alter the final appearance of your Blossom.
For example, a smaller hook and lighter weight yarn will produce a smaller bunny.
There are some minor adjustments to consider when using the Nilli Nilli yarn compared to cotton yarn, these
adjustments are mentioned in the pattern where applicable.
For the purpose of this pattern, I have used Beige 055 cotton yarn as the main colour.
This pattern contains affiliate links; by making a yarn purchase through these links, you are kindly supporting my
creative work without any extra cost to yourself.
HEAD & BODY
Use beige yarn.
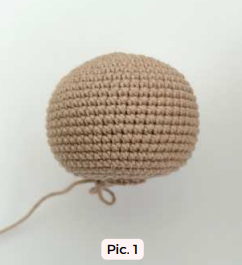
Rnd 1: 6 sc in to a mr (6)
Rnd 2: [inc] x 6 (12)
Rnd 3: [1 sc, inc] x 6 (18)
Rnd 4: 1 sc, inc, [2 sc, inc] x 5, 1 sc (24)
Rnd 5: [3 sc, inc] x 6 (30)
Rnd 6: 2 sc, inc, [4 sc, inc] x 5, 2 sc (36)
Rnd 7: [5 sc, inc] x 6 (42)
Rnd 8: 3 sc, inc, [6 sc, inc] x 5, 3 sc (48)
Rnd 9: [7 sc, inc] x 6 (54)
Rnd 10 – 20 (11 rnds): 54 sc (54)
Rnd 21: [7 sc, dec] x 6 (48)
Rnd 22: 1 sc, dec, [2 sc, dec] x 11, 1 sc (36)
Rnd 23: [1 sc, dec] x 12 (24) – start stuffing the head and continue
until the end.
Rnd 24: [dec] x 12 (12)
Rnd 25: [inc] x 12 (24)
Rnd 26: 24 sc (24)
Rnd 27: [7 sc, inc] x 3 (27)
Rnd 28: 27 sc (27)
Rnd 29: [8 sc, inc] x 3 (30)
Rnd 30: 30 sc (30)
Rnd 31: [9 sc, inc] x 3 (33)
Rnd 32: 33 sc (33)
Rnd 33: 13 sc, [1 sc, inc] x 4, 12 sc (37)
Rnd 34: 37 sc (37)
Rnd 35: 12 sc, [2 sc, inc] x 4, 13 sc (41) – mark the first and last inc
sts (these indicate the centre of the back) (Pic. 2).
Rnd 36: 41 sc (41)
Rnd 37: 11 sc, [3 sc, inc] x 4, 14 sc (45)
Rnd 38: 45 sc (45)
Rnd 39: [14 sc, inc] x 3 (48)
Rnd 40 – 45 (6 rnds): 48 sc (48)

Rnd 46: 3 sc, dec, [6 sc, dec] x 5, 3 sc (42)
Rnd 47: [5 sc, dec] x 6 (36)
Rnd 48: 2 sc, dec, [4 sc, dec] x 5, 2 sc (30)
Rnd 49: [3 sc, dec] x 6 (24)
Rnd 50: 1 sc, dec, [2 sc, dec] x 5, 1 sc (18)
Rnd 51: [1 sc, dec] x 6 (12)
Rnd 52: [dec] x 6 (6)
F/O and weave the yarn tail through each FLO of the last
round. Gently pull the tail to close the opening and
weave it in.

Once you have completed the body, the 2 marked sts indicate the middle of the back which will sit to one side of the bunny,
keep the markers in place for reference when embroidering the face and attaching the other pieces. You can also choose
which side your bunny will sit (see Pic. 4 & 5).
ARMS – (MAKE 2)
Use beige yarn; the arms are not stuffed.
Rnd 1: 5 sc in to a mr (5)
Rnd 2: [inc] x 5 (10)
Rnd 3 – 5 (3 rnds): 10 sc (10)
Rnd 6: dec, 8 sc (9) – mark the dec st (this indicates the
top of the arm).
Pic. 6 Pic. 7 Pic. 8
Rnd 7: 9 sc (9)
Rnd 8: dec, 7 sc (8)
Rnd 9 – 12 (4 rnds): 8 sc
At the end of rnd 12, make additional sc so you are aligned with
the marked st in rnd 6 (Pic. 7). Flatten your work and sc in the
next 4 sts through both layers to close. F/O and leave a long tail
for attaching.

FEET – (MAKE 2)
Use beige yarn.
Rnd 1: 6 sc in to a mr (6)
Rnd 2: [inc] x 6 (12)
Rnd 3: [3 sc, inc] x 3 (15)
Rnd 4 – 5 (2 rnds): 15 sc (15)
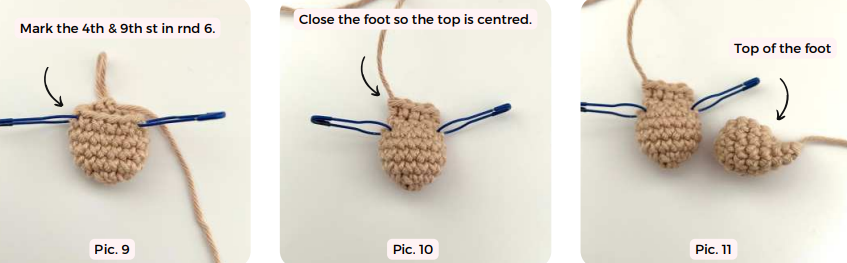
Pic. 9 Pic. 10 Pic. 11
Rnd 6: 3 sc, [1 sc, dec] x 3, 3 sc (12) – mark the 4th & 9th st, this
indicates the sides of the foot (Pic. 9).
Rnd 7: 3 sc, [dec] x 3, 3 sc (9) – stuff the foot lightly to rnd 5.
At the end of rnd 7, make additional sc to the edge of your work
so that the marked dec’s are on the sides of the foot. Flatten your
work and sc in the next 4 sts through both layers to close. F/O
and leave a long tail for attaching. Remove the st markers.
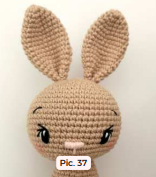
EARS – (MAKE 2)
Use beige yarn, the ears are not stuffed.
Rnd 1: 6 sc in to a mr (6)
Rnd 2: [1 sc, inc] x 3 (9)
Rnd 3: [2 sc, inc] x 3 (12)
Rnd 4: [3 sc, inc] x 3 (15)
Rnd 5: [4 sc, inc] x 3 (18)
Rnd 6: [5 sc, inc] x 3 (21)
Rnd 7 – 13 (7 rnds): 21 sc (21)
Rnd 14: [5 sc, dec] x 3 (18)
Rnd 15: [4 sc, dec] x 3 (15)
Rnd 16: [3 sc, dec] x 3 (12)
Rnd 17: 12 sc (12)
Flatten your work so the incs of rnd 6 are sitting at the sides, if
needed, make additional sc to get to the edge of the ear (Pic. 12).
F/O with a long tail. Fold the ear at the bottom end so that the
two edges meet, using the tail, make a st through all layers to
create the ear shape (Pic. 13). Leave the tail for attaching.

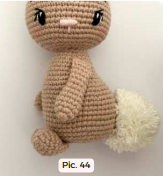
POMPOM TAIL
Make a mini pompom approximately 3.5cm in diameter using cream yarn (for the Nilli Nilli version I made the pompom tail 4.5cm in diameter and used light grey 003 cotton yarn). You can choose you preferred method to make the mini pompom, here is mine.
Start with cutting a length of yarn, long enough to secure and attach the pompom to the body, lay it out horizontally and put it to one side.

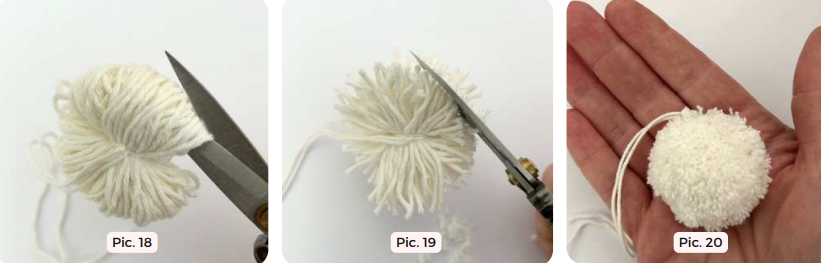
Cut all the loops and then fluff and trim the pompom until you have reached the right size and fluffiness!
FACIAL DETAILS
The eyes are made using black sport weight yarn for the main section, black embroidery thread for finer details and white dk
yarn for the white section. Leave the securing of all tails until the end, just in case you need to make any adjustments as you
work.

Start by mapping the centre of the head using the marked sts on the body which should sit to one side. Once you are satisfied with the position, mark with a pin and use this as a refence mark for the face.

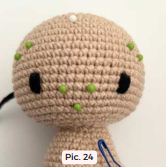
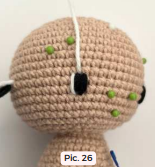
Mark out the eyes over rnds 16 & 17, 11 sts apart; the nose between rnds 17 to 19, 3 sts wide and the eyebrows over rnd 12, 2 sts wide with 14 sts apart. For the Nilli Nilli version, adjust the positioning accordingly to size (I made the eyes 10 sts apart and the nose 4 sts wide).

Eyes: Using a length of black sport weight yarn, embroider the main section of the eye with a few sts until you’ve reach your desired thickness. I made 5 sts.
Repeat on the other side and take the yarn tail back out to your starting point.

Using the white dk yarn, make a white line to the outer side of the eye.
Repeat for the other eye and then bring the yarn out at the top centre of the first eye.

Insert your needle in to the middle of the black section to make the white spec of the eye.

Repeat on the other eye and take the yarn back out to your starting point.

Using a length of black embroidery thread, make a st from top inner side of the eye to one st out from the middle of the eye, as shown in Pic. 29.

Bring the thread out at the st you started and make the 2nd eye lash one st above the first on the outer side, as shown in Pic. 30.

Bring the thread back out at the st space you started and make the 3rd eye lash, one st above the 2nd, as shown in Pic. 31. Repeat for the 2nd eye.

Using the same thread, make the eyebrows. Once finished, take the thread back out in the same st as the starting tail. Secure and weave in all tails. (Remove the centre head pin).

Nose: Use a length of pink yarn and make a double whip stitch.
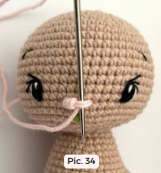
Take the yarn under the double whip stitch and wrap it around until the stitches are no longer visible. Pull on the starting tail slightly to tighten up the whip sts when finished.

Make the centre line for the nose and then take the yarn back in to the head, secure and hide the tails inside. If preferred, you can make the cheeks with the same colour pink and embroider them 2 sts wide to the side and beneath the eyes. Alternatively, you can use a little blush.
ASSEMBLY

Ears: Mark out the position of the ears over rnds 3 & 4, making the fronts in line with the mr and the backs, 3 sts back.
Attach the ears on each side, secure and hide the tails inside the head.

Tail: Attach the pompom tail to the back of the body using the marked sts to guide you. The tail should sit in a position so that it will aid the bunny to stand once finished. I attached mine through rnds 43 & 44.

Feet: Mark out the position of the feet between rnds 47 & 48 at the front of the body with 2 sts between them.

Attach the feet on each side, ensuring that the top of the feet are the right way up. Secure and hide the tails inside the body.
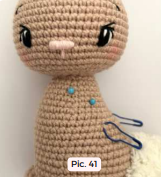
Arms: Mark out the position on the arms over rnds 29 & 30, at a slight angle with 13 sts apart, counting across the front in rnd 28.

Making sure that the marked sts are facing upwards, start to attach the arm. Remove the st markers.
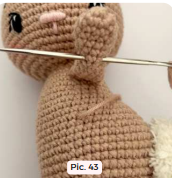
To hold the arms closer to the body, make a st through the inside of the arm between rnds 7 & 8 and the corresponding sts on the body, as shown in Pic. 43.
Finish attaching both arms, secure the tails and hide them inside the body. Remove the st markers from the back of the body.
FLOWERS – MAKE 10 (SMOKEY ROSE X 4 / WHITE X 3 / ROSE X 3)
Using the colour of your choice, work in rows.
Ch 15 and start in the 2nd ch from the hook.
Row 1: [1 sc, inc] x 7 (21)
F/O and leave a long tail for securing the flower and attaching. To make the flower shape, hold the tails between
your finger tips and roll the flower into a rose shape, secure with a few sts on the underside.
**The flowers for the Nilli Nilli version are made with cotton yarn using a 2.5mm hook with the following
adjustment to the pattern:
Ch 15 and start in the 2nd ch from the hook.
Row 1: [1 hdc, hdc inc] x 7 (21)

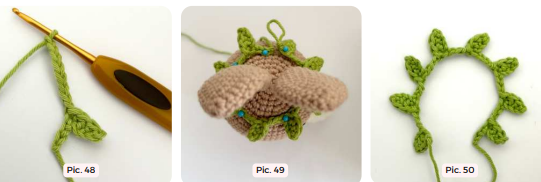
LEAF GARLAND
Using pistachio yarn, work the garland in to a ch.
Row 1: [ch 8, starting in the 3rd ch from the hook, 1 sc, dc, sl st] x 8. Pause and check the size on the head (Pic. 49),
the chs of the garland sit over rnd 6 all the way around the head; adjust the number of chs and leaves accordingly
to fit. F/O leaving a long tail for attaching.
**The garland for the Nilli Nilli version is made using a 2.5mm hook, following the same pattern above.

Attach the leaf garland to the head over rnd 6 by the ch sections only, do not stitch the leaves down. Secure and hide the tails inside the head.

Pin the flowers in place over the top of the garland, alternating the colours and ensuring they are sitting snuggly next to each other.
Attach, secure and hide the tails of each flower inside the head. Adjust the leaves so they sit freely between the flowers to finish.